

🌟 IoT Smart Weather Station with ESP32
1. Introduction
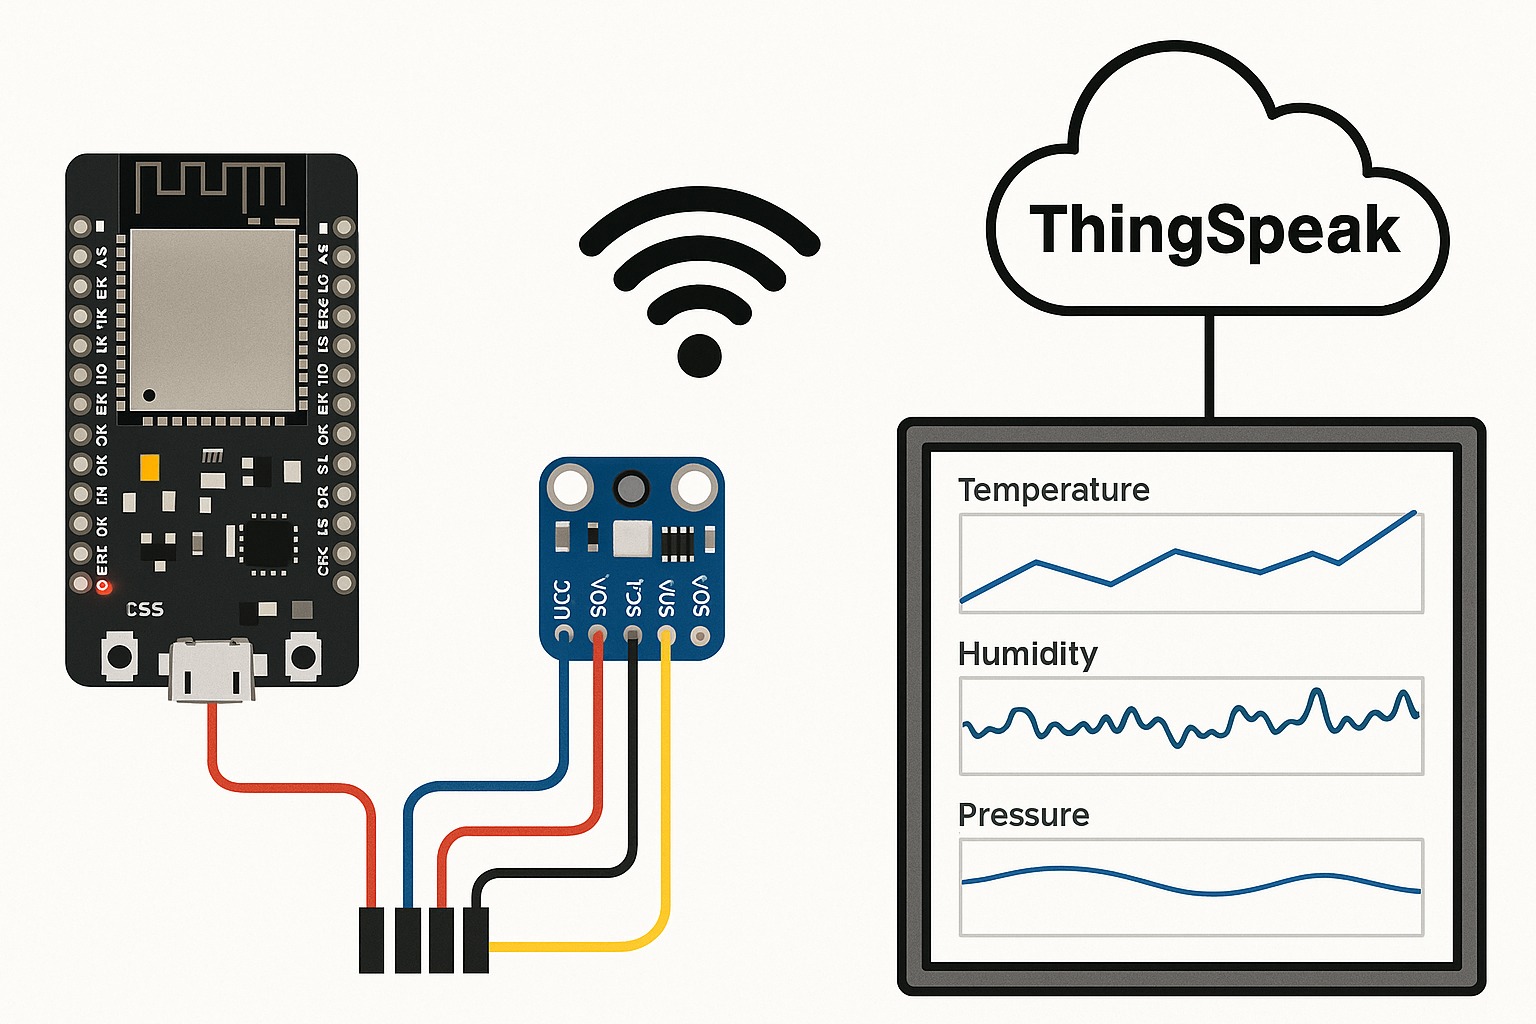
In this project, we will create a smart IoT weather station using an ESP32 microcontroller and a BME280 environmental sensor.
The station will measure temperature, humidity, and atmospheric pressure, then transmit the data to a cloud platform (ThingSpeak) for remote real-time monitoring.
Real-world applications include:
- Environmental monitoring systems
- Smart agriculture (greenhouses, farms)
- Home and office automation
- Research and education projects
2. Learning Objectives
By completing this project, you will:
- Understand how to interface sensors with the ESP32 via I2C communication.
- Learn how to connect an ESP32 to Wi-Fi and send data to the cloud.
- Build basic data visualization using a free IoT cloud service.
- Strengthen your knowledge of embedded systems and wireless communication.
3. Tools and Components
Hardware Needed:
- ESP32 Development Board (e.g., ESP32-WROOM-32)
- BME280 sensor module
- Breadboard and jumper wires
- Micro-USB cable for programming the ESP32
- Optional: 10kΩ resistors for I2C pull-up stabilization (only if needed)
Software Needed:
- Arduino IDE with ESP32 board support installed
- BME280 sensor libraries (Adafruit BME280 and Adafruit Unified Sensor)
- ThingSpeak IoT platform account (free)
- WiFi.h and ThingSpeak.h libraries for cloud communication
4. Background and Core Concepts
ESP32 Overview:
The ESP32 is a low-cost, low-power microcontroller with integrated Wi-Fi and Bluetooth. It’s ideal for IoT applications due to its processing power and connectivity.
BME280 Sensor Overview:
The BME280 is a highly integrated environmental sensor that can measure temperature, humidity, and pressure with high accuracy. It communicates over I2C (or optionally SPI).
ThingSpeak Platform:
ThingSpeak is an IoT analytics platform service that lets you collect, visualize, and analyze live sensor data in the cloud. It’s simple, free for basic usage, and supports integration with MATLAB for advanced analysis.
5. Step-by-Step Build Guide
Hardware Connections (Wiring)
To connect the BME280 sensor to the ESP32:
- Connect the VCC pin of the BME280 to the 3.3V pin on the ESP32.
- Connect the GND pin of the BME280 to a GND pin on the ESP32.
- Connect the SDA pin of the BME280 to GPIO21 on the ESP32.
- Connect the SCL pin of the BME280 to GPIO22 on the ESP32.
Note: ESP32 uses GPIO21 as SDA and GPIO22 as SCL by default for I2C communication.
Pull-up resistors on SDA and SCL lines (10kΩ to 3.3V) can improve stability, especially with long wires or multiple I2C devices.
Software Setup
- Open the Arduino IDE.
- Install ESP32 support by adding the following URL to Preferences under “Additional Boards Manager URLs”:
https://dl.espressif.com/dl/package_esp32_index.json - Install the required libraries:
- Adafruit BME280
- Adafruit Unified Sensor
- ThingSpeak
- Select the correct ESP32 board and COM port.
Arduino Code Explanation
We will program the ESP32 to:
- Connect to Wi-Fi.
- Initialize and read from the BME280 sensor.
- Send the readings to ThingSpeak every 20 seconds.
Complete Source Code:
#include <WiFi.h>
#include <Wire.h>
#include <Adafruit_Sensor.h>
#include <Adafruit_BME280.h>
#include “ThingSpeak.h”
// WiFi credentials
const char* ssid = “YOUR_WIFI_SSID”;
const char* password = “YOUR_WIFI_PASSWORD”;
// ThingSpeak channel details
unsigned long myChannelNumber = YOUR_CHANNEL_NUMBER;
const char* myWriteAPIKey = “YOUR_WRITE_API_KEY”;
WiFiClient client;
Adafruit_BME280 bme;
void setup() {
Serial.begin(115200);
// Connecting to Wi-Fi
WiFi.begin(ssid, password);
Serial.print(“Connecting to WiFi…”);
while (WiFi.status() != WL_CONNECTED) {
delay(500);
Serial.print(“.”);
}
Serial.println(” Connected!”);
// ThingSpeak setup
ThingSpeak.begin(client);
// BME280 sensor setup
if (!bme.begin(0x76)) { // If 0x76 fails, try 0x77
Serial.println(“Could not find a valid BME280 sensor, check wiring!”);
while (1);
}
}
void loop() {
// Reading sensor values
float temperature = bme.readTemperature();
float humidity = bme.readHumidity();
float pressure = bme.readPressure() / 100.0F; // Convert to hPa
// Printing values to Serial Monitor
Serial.println(“Temperature: ” + String(temperature) + ” °C”);
Serial.println(“Humidity: ” + String(humidity) + ” %”);
Serial.println(“Pressure: ” + String(pressure) + ” hPa”);
// Sending data to ThingSpeak
ThingSpeak.setField(1, temperature);
ThingSpeak.setField(2, humidity);
ThingSpeak.setField(3, pressure);
int x = ThingSpeak.writeFields(myChannelNumber, myWriteAPIKey);
if (x == 200) {
Serial.println(“Channel update successful.”);
} else {
Serial.println(“Problem updating channel. HTTP error code ” + String(x));
}
delay(20000); // Send data every 20 seconds
}
ThingSpeak Setup Instructions
- Go to the ThingSpeak website and sign up for a free account.
- Create a new channel.
- Enable fields for Temperature, Humidity, and Pressure.
- Copy your Channel ID and Write API Key for use in the Arduino code.
6. Testing and Debugging Tips
- Use the Serial Monitor to confirm Wi-Fi connection and sensor readings.
- If the BME280 sensor is not detected, double-check wiring and verify the I2C address (some modules use 0x77 instead of 0x76).
- If Wi-Fi is not connecting, ensure SSID and password are correct and that your router broadcasts a 2.4 GHz network (ESP32 may not connect to 5 GHz).
- If no data appears in ThingSpeak, check your API Key and Channel Number carefully in the code.
7. Extensions and Advanced Ideas
After completing the basic project, you can explore many exciting extensions:
- Add a local OLED display to show readings directly on the device.
- Power the weather station using a small solar panel and rechargeable battery for outdoor deployment.
- Add notifications such as SMS or email alerts when environmental conditions go outside of safe ranges.
- Store sensor data to an SD card for offline data logging.
- Implement mobile app integration with Blynk for smartphone notifications.
🎯 Conclusion
You’ve now built a complete, cloud-connected weather station using the powerful ESP32 and the BME280 sensor!
This project bridges embedded systems, IoT communication, and cloud data visualization — core skills for any aspiring engineer or hobbyist.
Keep experimenting by adding more sensors, improving data accuracy, and creating your own IoT dashboards!