
Welcome to the IoT Smart Alarm Design Guide.
This article is your gateway to mastering the art of creating intelligent alarms infused with IoT capabilities. Dive into design principles, integration strategies, and user-centric features, unlocking a world of innovation in alarm technology. Whether you’re a seasoned developer or a curious enthusiast, this guide will equip you with the knowledge to craft cutting-edge IoT smart alarms. Join us on a journey of exploration and discovery as we navigate the intricate landscape of designing alarms that seamlessly blend intelligence and connectivity. While often overlooked, the morning wake-up alarm plays a crucial role in our daily lives, ensuring timely awakenings for work, school, and other essential commitments. Beyond its timekeeping function, alarms contribute to maintaining a consistent sleep schedule.

In this project, we leverage the power of the Internet of Things (IoT) to create a sunrise alarm. The device automatically identifies your geographical location, allowing you to customize the alarm accordingly.
To bring this IoT project to life, we’ll utilize the ESP8266 microcontroller board and integrate it with the Weather API. Before getting started, ensure you’ve registered an account on www.weatherapi.com to obtain the necessary API key for building this innovative device.
Essential Components
To prototype this device, you’ll need the following components:
- ESP8266 x1
- Buzzer x1
- Push button x1
- Resistor 330Ω x2
- LED x1
- Breadboard
- Connecting wires/Dupont wires
Circuit connections
To assemble this device, you’ll require an ESP8266 microcontroller board. Follow these steps:
- Connect the push button to pin GPIO4. Attach one terminal of the push button to the ESP8266’s 3V pin using a 330Ω resistor. Also, connect this terminal to GPIO4. Connect the other push button terminal to the ground.
- Interface a buzzer with GPIO5 on the ESP8266. Connect one terminal of the buzzer to GPIO5 and the other terminal to the ground.
- Connect an LED to GPIO10 on the ESP8266, incorporating a 330Ω series resistor.

Creating an Account and Obtaining API Key for Weather Integration
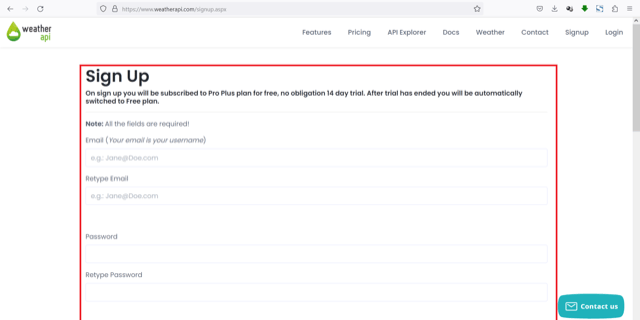
To operate this device, it relies on the Weather API. Register for an account on www.weatherapi.com (click the ‘Sign up’ button on its homepage) and obtain an API key.

Fill in your details to complete the sign-up process.
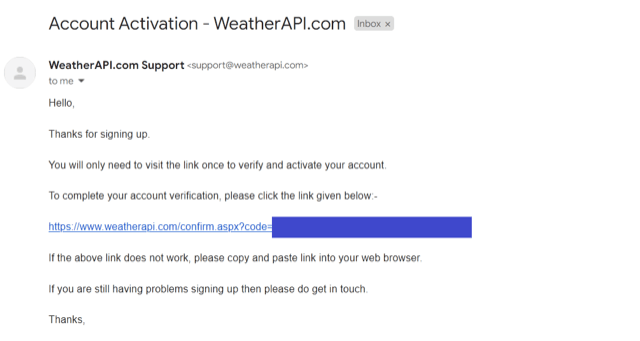
Check your registered email account for a confirmation email. Open your email and confirm your Weather API sign-up.
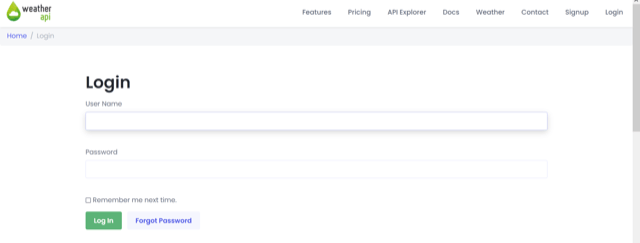
Then, login at www.weatherapi.com with your registered credentials.
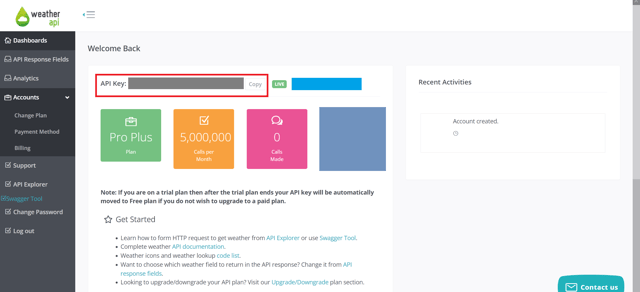
After you login, an API key will be provided. Copy and note the API key, which we’ll use as the device code.
Following the circuit connections, upload the provided Arduino sketch to the ESP8266.
#include <ESP8266WiFi.h>
#include <ESP8266HTTPClient.h>
#include <WiFiClient.h>
#include <ArduinoJson.h>

const char* ssid = "replacewithyourSSID";
const char* password = "replacewithyourNetworkPassword";
const char* API_KEY = "replacewithyourWeatherAPIkey";
long sunriseTimeMinutes;
long localTimeMinutes;
boolean setSunriseAlarm = false;
const int buttonPin = 4;     // the number of the pushbutton pin
const int buzzerPin =  5;
const int ledPin =  10;
bool ledState = LOW;

void setup() {
  pinMode(buttonPin, INPUT);
  pinMode(buzzerPin, OUTPUT);
  pinMode(ledPin, OUTPUT);
  Serial.begin(115200);

  // Connect to Wi-Fi
  Serial.println();
  Serial.print("Connecting to ");
  Serial.println(ssid);

  WiFi.begin(ssid, password);

  while (WiFi.status() != WL_CONNECTED) {
    delay(1000);
    Serial.print(".");
  }

  Serial.println("");
  Serial.println("WiFi connected.");
  Serial.println("IP address: ");
  Serial.println(WiFi.localIP());
}

long convertToMinutes(const char* time12) {
  int h, m;
  char ampm[3];
  // Extract hour, minute, and AM/PM from the input string
  sscanf(time12, "%d:%d %2s", &h, &m, ampm);
  // Convert to 24-hour format
  if (strcmp(ampm, "PM") == 0 && h != 12) {
    h += 12;
  }
  else if (strcmp(ampm, "AM") == 0 && h == 12) {
    h = 0;
  }
  long timeInMinutes = h*60+m;
  return timeInMinutes;
}

void stringToCharArray(String inputString, char* outputBuffer, int bufferSize) {
  if (inputString.length() < bufferSize) {
    inputString.toCharArray(outputBuffer, bufferSize);
  } else {
    // Handle the case where the string is too long for the buffer
    Serial.println("Error: Buffer size is too small for the input string.");
  }
}

void getSunriseTime(){
    WiFiClient client;
    HTTPClient http;
    String endpoint = "http://api.weatherapi.com/v1/forecast.json?key=" + String(API_KEY) + "&q=auto:ip&days=1";
    // Specify the IP geolocation service's endpoint
    http.begin(client, endpoint);
    // Begin the request
    int httpCode = http.GET();
    // If the request was successful, handle the response
    if (httpCode > 0) {
      String payload = http.getString();
      Serial.println(payload); // Print the response payload
      int sunrisePos = payload.indexOf("\"sunrise\":\"");
      if (sunrisePos > 0) {
        int startTime = sunrisePos + 11; // move past the identifier
        int endTime = payload.indexOf("\"", startTime);
        String sunriseTime = payload.substring(startTime, endTime);
        Serial.println("Next Sunrise Time: " + sunriseTime);
         char time12[12];
         stringToCharArray(sunriseTime, time12, sizeof(time12));
        long sunriseTimeMinutes = convertToMinutes(time12);
         Serial.println(sunriseTimeMinutes);
      }
    } else {
      Serial.printf("[HTTP] GET... failed, error: %s\n", http.errorToString(httpCode).c_str());
    }
    // End the connection
    http.end();
 }

void getCurrentTime(){
   int y, mn, d, h, m;
   WiFiClient client;
   HTTPClient http;
   String endpoint = "http://api.weatherapi.com/v1/current.json?key=" + String(API_KEY) + "&q=auto:ip";
   http.begin(client, endpoint);
   int httpCode = http.GET();
   if (httpCode > 0) {
      String payload = http.getString();
      int timePos = payload.indexOf("\"localtime\":\"");
      if (timePos > 0) {
        int startTime = timePos + 13; // move past the identifier
        int endTime = payload.indexOf("\"", startTime);
        String localtime = payload.substring(startTime, endTime);
        Serial.println("Current Local Time: " + localtime);
        char time12[18];
        stringToCharArray(localtime, time12, sizeof(time12));
        sscanf(time12, "%d-%d-%d %d:%d", &y, &mn, &d, &h, &m);
        long localTimeMinutes = h*60+m;
        Serial.println(localTimeMinutes);
      }
    } else {
      Serial.printf("[HTTP] GET... failed, error: %s\n", http.errorToString(httpCode).c_str());
    }
    // End the connection
    http.end();
 }

void loop() {
  if (WiFi.status() == WL_CONNECTED) {
    getSunriseTime();
    if(digitalRead(buttonPin)==LOW){
      setSunriseAlarm = !setSunriseAlarm;
	  ledState = !ledState;
	  digitalWrite(ledPin, ledState);
	  delay(50);
      }
    if(setSunriseAlarm){
      Serial.println("Sunrise Alarm is Set");
	  getCurrentTime();
	  if(localTimeMinutes-sunriseTimeMinutes==0){
			digitalWrite(buzzerPin, HIGH);
			delay(60000);
			digitalWrite(buzzerPin, LOW);
		}
  }
  delay(60000); // Delay for 1 minute before fetching again
}
}
Functionality of the IoT Device
This intelligent IoT device automatically configures a morning alarm to synchronize with sunrise time based on the user’s current location. Utilizing the Weather API for geolocation data, the device connects to the local WiFi network upon activation, with predefined credentials.
Once online, the device determines the current geographical location using its IP address. It calculates and stores the time of sunrise for the next day as a global variable, measured in minutes from midnight.
Users can set the sunrise alarm by pressing a button on the device, indicated by the glowing LED. To deactivate the alarm, a single press of the button suffices.
If the alarm is set, the device continually checks the local time at one-minute intervals, converting it into minutes from midnight. Simultaneously, it compares this local time with the stored sunrise time. When the time difference reaches zero, the device activates its alarm, signaling for one minute.
The programming code
The Arduino sketch for this device starts by importing the necessary libraries: ESP8266WiFi.h, ESP8266HTTPClient.h, WiFiClient.h, and ArduinoJson.h. ESP8266WiFi.h and WiFiClient.h facilitate WiFi connectivity, ESP8266HTTPClient.h handles HTTP requests for the Weather API, and ArduinoJson.h processes JSON data from the API.
Variables are declared to store WiFi network credentials and the API key from weatherapi.com. Users must replace these values with their own network information and API key.
Additional variables are declared for storing sunrise time, current local time, sunrise alarm status, and LED indicator status. Pin assignments are initialized for interfacing components.
In the setup() function, the button pin is set as input, while the buzzer and LED pins are set as digital outputs. Serial communication is set at 115200 bps, and the device connects to the WiFi network using WiFi.begin(). Once connected, the IP address and local IP address are printed on the serial port.
User-defined functions include convertToMinutes() for converting time to minutes from 12 a.m., stringToCharArray() for converting API strings to character arrays, getSunriseTime() for fetching the next sunrise time, and getCurrentTime() for obtaining the current local time.
In the loop() function, the device checks its WiFi connection status, retrieves the next day’s sunrise time, and sets or unsets the sunrise alarm based on button input. If the alarm is set, the device fetches the current local time and triggers the alarm if the time difference is zero.
The device’s Arduino sketch initiates by importing essential libraries: ESP8266WiFi.h, ESP8266HTTPClient.h, WiFiClient.h, and ArduinoJson.h. The first two are essential for WiFi connectivity, while ESP8266HTTPClient.h manages HTTP requests to the Weather API, and ArduinoJson.h processes JSON data obtained from the Weather API.
Variables are declared to store the WiFi network’s SSID and network key. Users are required to substitute these values with their own WiFi connection details. Another variable is created to hold the API key from weatherapi.com, necessitating users to replace it with their registered API key.
The Arduino sketch for the device commences by importing essential libraries: ESP8266WiFi.h, ESP8266HTTPClient.h, WiFiClient.h, and ArduinoJson.h. Notably, ESP8266WiFi.h and WiFiClient.h are pivotal for WiFi connectivity, ESP8266HTTPClient.h facilitates HTTP requests to the Weather API, and ArduinoJson.h manages the processing of JSON data retrieved from the Weather API.
The sketch then declares variables for the following:
- Sunrise time in minutes
- Current local time in minutes
- Sunrise alarm status
- Indicator LED status
The variables are initialized to store the assignments for the interfacing pins. Within the setup() function, the button’s interfacing pin is configured as an input, while the pins for the buzzer and LED interfacing are configured as digital outputs. The baud rate for serial communication is established at 115200 bps. The device establishes a connection to the WiFi network by invoking the WiFi.begin() method. Upon successful WiFi connection, the IP address and local IP address are printed on the serial port.
- The convertToMinutes() function, defined by the user, transforms the time obtained from the Weather API into a 12-hour format, representing the number of minutes from 12 a.m. onwards.
- To convert strings received from the Weather API into character arrays, the user employs the stringToCharArray() function.
- The getSunriseTime() function establishes a connection with the Weather API to fetch the upcoming sunrise time, storing it as the number of minutes from 12 a.m. onwards.
- Utilizing the getCurrentTime() function, the device connects with the Weather API to retrieve the current local time, storing it as the number of minutes from 12 a.m. onwards.
- Within the loop() function, the device checks its WiFi connection status. If connected, it obtains the sunrise time for the following day by invoking the getSunriseTime() function.
- Pressing the ON/OFF button triggers the setting or unsetting of the alarm based on the sunrise time. When the alarm is set, the device retrieves the local time using the getCurrentTime() function.
- The time difference between the sunrise time and the current local time is calculated in minutes from 12 a.m. If the difference is zero, the alarm activates for one minute.
Outcomes
Displayed is a snapshot of the messages transmitted through the serial port by the intelligent IoT morning alarm. If the sunrise alarm is configured based on the user’s geolocation, the message “Sunrise Alarm is Set” is appended to the end of the serial port communication. This could prove to be a valuable feature for inclusion in smartwatches and fitness devices.
